Category Archives: Uncategorized

Getting two same-model monitors to display the same colors

For a long time, I had lived with my two monitors of the exact same model (LG 27UK650-W) displaying noticeable different colors and text in one of them being much sharper than the other. They’re both driven by the same graphics card (an NVIDIA GeForce GTX 750 Ti) but one of them is connected with a Display Port cable, and the other one an HDMI cable. Several articles talk about making sure that they’re both using “Full RGB” instead of “Limited RGB” which you normally do in the Control Panel of the graphics card, and/or the settings of the monitor itself. I tried that and couldn’t get them to display the same, and interestingly, they were even showing me different options in the monitor settings (e.g. when selecting a picture mode, the Display Port monitor showed me a list of 10+ profiles to choose from, while the HDMI one only displayed 4, none matching the ones from the first one).

Today I finally found the solution! Turn off the “Use HDR” setting from Windows’ “Display Settings” window:

As soon as I did that (did I restart afterwards? I can’t remember, try that too if you need to) for the monitor on HDMI (the Display Port one didn’t even show me that setting), the picture mode menu in both monitors started showing the same list of options, I was able to make all the settings match, and now they look as close to identical as is practically possible without doing very detailed calibration.

Configuring Cloudflare in DNS-O-matic

Today I ran into an issue configuring DNS-O-Matic to update my Cloudflare DNS records (specifically, the record with the dynamic IP that points to my home IP address, and is automatically updated by the router in my home network). I entered all necessary settings in the DNS-O-Matic form, but when I sent an update to it the update to the Cloudflare service always errored out with message “err Invalid request headers (6003)”.

After a bit of trial and error, and going back and forth through documentation and tutorials, I finally figured out that the DNS-O-Matic field that says “API Token” does not expect what Cloudflare calls an API Token; it wants Cloudflare’s Global API Key.

This is actually clear in Cloudflare’s documentation on how to set up DNS-O-Matic, although I think it needs to be more explicitly stated that you’re not supposed to use the Cloudflare thing with the same name that the DNS-O-Matic form has. Maybe the documentation predates the implementation of API Tokens on Cloudlflare’s side and that’s why the terminology isn’t the clearest.

Once I put my Global API key there, the updates started working as expected. Then I pinged OpenDNS on Twitter to see if they have any plans of supporting API Tokens instead of the global API key, which would allow for more granular control of what they can do and would be a good security practice. That way if the DNS-O-Matic databases ever got compromised, the attackers wouldn’t get complete control over our Cloudflare accounts.

Beware your keyboard layout when using keyboard shortcuts in the Azure Portal

Today I was talking with Microsoft support to troubleshoot an Azure issue and they asked me to hit Ctrl + Alt + D anywhere in the portal to bring up overlays with debugging information. Something like this:

alt-text

That shortcut was new to me and I love learning new useful keyboard shortcuts, but when I tried it… nothing happened. So I tried in another window… an incognito window… another computer… and it wouldn’t work anywhere!

I found some documentation that mentions it, but nothing about pre-requisites or notes about why it wouldn’t be working.

Now, just as people who work on IT and/or software development learn that whenever you have an inexplicable issue you always turn to look at caching and DNS, I’ve learned to also look at my (admittedly unusual) keyboard setups. And after recently solving a long-standing issue I had with accented characters, looking at my keyboard setup was fresh on my mind.

And what do you know, of course the “problem” was there! Turns out that on the standard “English: US” keyboard layout, Ctrl + Alt + D on its own does nothing. The Javascript code in the Azure portal is then free to use it as a shortcut. But on the “English: United States – International” layout that I use, Ctrl + Alt + D actually produces a character: ð (I discovered this by pressing that key combo into the supreme tool: Notepad). And I bet the Azure portal isn’t prepared to handle that case.

So, solution to get those debugging overlays? Simply change my keyboard layout just to trigger the shortcut and enable/disable them. When you do funky stuff with your keyboards, like I do, you should always keep it in mind when something doesn’t seem to work as expected. And keep Notepad (or your plain text editor of choice) handy to check that your key presses aren’t generating characters that a standard layout would not.

Typing accented characters on a Dvorak layout

This post requires some quick bit of context. First, for more than 10 years I’ve been using DVORAK as my main keyboard layout. Let’s skip the arguments about it being better than QWERTY or not; at this point I just like it, and my subjective experience is enough for me to keep using it (and as a programmer, I’ve found that it does give me easier access to characters that come up frequently when coding). Second, my native language is Spanish, and that’s what I type in when chatting with Spanish-speaking friends, among other things. Importantly, I write following the rules for accenting characters (á é í ó ú), and we also have the letter ñ, that doesn’t have its own key on the US QWERTY nor the DVORAK layouts, so I also configured the Spanish – Latin American layout so I can switch to it when necessary.

That said, I’ve known for a while that if I’m typing in Microsoft Word with the Dvorak layout, I’m able to use a couple of simple key combinations to type accented characters: Ctrl + ' followed by a vowel will produce the accented vowel, and Ctrl + Shift + ` (which is a ~) followed by n will produce ñ. But the same key combinations in any other application, would not work! I would only get unaccented vowels or the letter n. So when I’m chatting, doing a browser search, writing code comments in Spanish, etc, I frequently have to switch my keyboard layout within Windows to Spanish (at least I have Win + Space as a shortcut to do that), type my accents, and then go back to my main Dvorak layout. It completely breaks my flow while typing, and that’s pretty annoying.

Today I was playing with my new split, mechanical, can-remap-any-keys keyboard (the Dygma Raise, post about that probably coming soon), thinking about setting the Dvorak layout directly on it, and some funky interactions with the Windows keyboard layout made me decide to figure out the issue once and for all.

And that’s how I learned about dead keys. In a nutshell, there are keyboard layouts that define some of their keys in a way that clicking on them has no immediate effect, and instead they (potentially) modify what happens on the next keystroke. For example, the United States – International keyboard layout included in Windows treats the key for a single quote ' as a dead key: press it once and nothing happens, but if you then press a vowel you get an accented vowel (and if you press anything that does not have an accented version, you get the quote followed by whatever character came next, or just the quote if you pressed the space bar as the follow-up character). Same goes for the tilde ~ with the only difference that you have to start with Shift + ` to “press” the tilde dead key, and then pressing n produces ñ. Accents in the Spanish – Latin American layout work just like that too.

Now, here’s the thing: the United States – Dvorak layout that comes with Windows does not have any dead keys, so how come I’ve been using them for years in Microsoft Word? Well…

In Microsoft Word (and in most other text-input fields), using the Control key with a key that usually resembles the diacritic (e.g. ^ for a circumflex) acts as a dead key

https://en.wikipedia.org/wiki/Dead_key#Dead_keys_on_various_keyboard_layouts

Aha! So Word makes an effort to be smart no matter your actual layout, but other applications can’t be bothered (since they’re not text processors, I guess I don’t blame them).

At this point a solution was brewing in my mind. I knew that the standard US keyboard layout that comes with Windows does not have dead keys, but that the United States – International layout does (precisely because it caters to users who might need “international characters” like accented ones). And I vaguely remember having had, or read about, a Dvorak – International layout, which hopefully does the same thing. I couldn’t find one among the layouts included with Windows, but a Google search confirmed that there’s several such layouts created by different people, which provide dead-key support in different ways (sometimes in the same way as the United States – International layout, sometimes using Ctrl as Word does, sometimes both), and are generally easy to install.

I’m not sure if I’ll go with that solution for my particular problem, but I’m pretty confident it would work. The fact that I can remap keys in my keyboard’s firmware allows me to create the Dvorak layout there, and permanently use the United States – International layout in Windows, which has dead key support… so I might just stick with that for now. But if you want to support any physical keyboard and be able to type accents on a Dvorak layout, your best bet is to find and install an “international version” for it, with dead key support.

Moving your user files and configuration out of C:\

Something I learned a while back when dealing with computers in general, was to try to keep my files in a separate drive than the Operating System. The first reason for that is to be able to easily do a clean reinstall of the OS if something goes terribly wrong (which can happen relatively easy if you’re learning UNIX, dealing with obscure Windows features, or doing a lot of software installs/uninstalls), without having to first move/backup your personal documents and similar files. Another reason is to keep disk usage low in the disk/partition where the OS lives. This is particularly relevant when the OS is installed on an SSD drive, which tend to not be huge (compared to HDD drives) and can easily run out of space if we put our decades-old photo/video collection in them.

All the “default folders” that Windows uses for user documents (Documents, Downloads, Desktop, and some others) are pretty easy to move to a different drive. Just browse to C:\Users\<username>\, right click one of those folders, go to the Location tab, specify a new path, and click Move.

Moving Windows’ default folders to another drive

And that’s it! You have to do this one by one for each of these Windows-managed folder, but luckily they’re not that many. If you already have a lot of data in them and you ask Windows to move it for you, then be prepared to wait according to how much data there is.

But things don’t end here. Because of the first reason mentioned above, I also want to make sure that configuration files created by applications I use (at least some of them), are also kept in a separate drive. So that after reinstalling the OS and reinstalling my most common tools/applications, I don’t have to recreate my customizations too. However we don’t usually have that much control over where each application decides to write its configuration files.

In the UNIX world this problem is basically nonexistent, because the user’s home directory is where pretty much everything writes configuration files that are specific to the current user. In Windows, many applications write them to wherever the %USERPROFILE% variable points to (by default C:\Users\<username>\). Sometimes directly there, sometimes under a subfolder. Another common location is to write them under %APPDATA% or %LOCALAPPDATA%, which by default are C:\Users\<username>\AppData\Roaming\ and C:\Users\<username>\AppData\Local\. The details of how these two differ from each other are outside the scope of this discussion, but you can apply the same idea that we’re about to see.

So what can we do about those files? At least for some of them, the solution is symlinks! You can think of symlinks as virtual files/folders that you put somewhere, and tell them to point to some other location, so that anything that tries to work (read/write) with the location where the symlink lives, is actually working on the target location, without being any wiser or having to know about the redirection that’s happening.

Let’s see this in action with a real-world example. In my machine I use Windows’ OpenSSH client to connect to remote computers pretty frequently. In order to not have to learn the different parameters, ports, usernames, etc. that I have to use fore each of the remote machines, I like to use an SSH config file. A simple one looks like this:

Host vm1
	Hostname actual-name-of-computer-1.some-domain.com
	User userforcomputer1
	IdentityFile ~/.ssh/id_ed25519

Host vm2
	Hostname actual-name-of-computer-2.some-other-domain.com
	User root
	Port 2222

Which lets me type ssh vm1 or ssh vm2 and have the OpenSSH client take care of the details for me.

The issue is that the OpenSSH client expects to find this file in %USERPROFILE%\.ssh\config, i.e. C:\Users\<username>\.ssh\config. But that file is definitely something that I want to keep with the rest of my data, so a OS reinstall doesn’t wipe it out. And there’s no way to tell this particular application to always look for the config file somewhere else (we can pass an extra parameter to ssh to tell it the location, but then we have to remember to pass that every time; inconvenient). What we can do is create a symlink at C:\Users\<username>\.ssh\ and point it to, say, D:\Users\<username>\.ssh\ (I like to create a similar folder structure in whatever drive I move the stuff to, makes it easy to know where the original locations are). That way the OpenSSH client will keep doing what it always does, but behind the curtains Windows will be actually dealing with files in the D:\ drive instead of the C:\ drive.

To create that symlink, open cmd (specifically cmd, this won’t work from Powershell or other consoles because the executable to create symlinks is part of cmd) and run something like this:

mklink /D "<link location>" "<target file/directory>"

In our example, this would look like

mklink /D "C:\Users\<username>\.ssh\" "D:\Users\<username>\.ssh"

And there you have it! The configuration file is kept safe in the D:\ drive, while OpenSSH still thinks everything is happening in C:\.

This approach works really well for applications that use a subfolder under %USERPROFILE%, and not so well for applications that write potentially many files directly in that folder. You can create a symlink for each file and they’ll work, but you need to know exactly which files to do it for, instead of just symlinking the one folder. And now you ask “Why don’t I just symlink C:\Users\<username>\ directly?”, which is a great question. And the answer might be that you can, but I haven’t convinced myself that it’s completely safe, so I can’t say that you should. If you do a search for this, some sources say that moving the User Profiles folder to another drive will stop Windows Update from working in the future, others say that they’ve done it and had no problem updating, others that it’s only (semi)supported if you do it with special configuration alternatives when installing Windows… it’s also not entirely clear to me if symlinking the profile folder of a specific user also counts as “moving the User Profiles folder to a different drive”. As tempting as it sounds, I haven’t made the time to test it. If you decide want to try this, you’ll probably need to log in with a different account, so you can move all the files for the user whose profile you want to move (otherwise some files could be locked or actively in use) before creating the symlink. And if you do, let me know how it went.

To conclude, note that in case of an OS reinstallation, the files will be safe in the other drive, but you’ll have to recreate the symlinks.

Make sure to update to Robo3T 1.3!

Robo3T is a pretty convenient tool to work with MongoDB databases. Version 1.3 came out over a year ago, so this post might seem terribly outdated, but it’s worth putting out because I just now I realized that one of the improvements in 1.3 is that it encrypts connection passwords instead of saving them as plaintext on disk.

I had 1.2 and 1.3 installed side by side (for no good reason, to be honest) but after realizing this, I immediately uninstalled version 1.2 and deleted the folder where passwords are stored in plaintext: C:\Users\<username>\.3T\robo-3t\1.2.1\ (and earlier). If for whatever reason you’re still using version 1.2 today, I strongly suggest you install 1.3, copy your connection info if necessary (I don’t remember if it did this automatically for me or not when I first installed it), remove 1.2 and clean up after it ASAP.

Why won’t Visual Studio hit my breakpoints!?

Recently I got into a situation where Visual Studio 2019 ignored all my breakpoints, even in the simplest applications. I first thought it had to do with particular projects (I was playing around with development for the .NET runtime), but a brand new, super-simple console application showed the same behavior.

Breakpoint will not be hit.png

As you can see, Visual Studio even said that no symbols were loaded for the document. But it wasn’t even for a library I had imported, it was my own application!

Once I realized this was happening for all applications, I went menu-exploring for any options that might be causing this, and it didn’t take too long for me to find the culprit. Something I had disabled at some point while trying to stop VS from trying to load symbols for all the .NET internals, because it was causing pretty noticeable delays. It wasn’t very clear at the moment what the effect was going to be, but now I get it! “Always load symbols located next to modules” is what tells Visual Studio to automatically load the debugging symbols created next to your app when developing locally, so you probably want to make sure this is always enabled:

Unchecked box.png

You get here by opening the Tools menu, selecting Options, then going to Debugging -> Symbols, and clicking on Specify included modules at the bottom. Also of note, this is only relevant if you’ve selected “Load only specified modules” as opposed to “Load all modules, unless excluded”, like shown in the screenshot.

As soon as I checked that box and OK-ed out of all pop-ups, my breakpoints started working normally again.

Opening files from OneDrive Personal Vault with Acrobat Reader DC

I’ve been using Microsoft OneDrive’s Personal Vault feature for sensitive documents for a while now and overall I’m pretty happy with it. But recently I noticed that after I unlocked the folder in my computer, double-clicking a PDF file opened up Acrobat Reader DC (my default PDF reader) but I got the following error:

There was an error opening this document. Access denied.

After some googling I found that this seems to be an issue with Acrobat Reader’s Protected Mode feature. The intention behind it is good (sandboxing the PDFs that you open, so they can’t wreak havoc indiscriminately in the computer), but in this particular case it was hindering me.

Since I only put PDFs in my Personal Vault after I’ve “vetted” them, and I’m pretty careful with what I open in general, I decided it was fine for me to disable Protected Mode by going to Edit -> Preferences -> Security (Enhanced)​ and unchecking Enable Protected Mode at startup:

acrobat protected mode

And voilà! PDFs from my Personal Vault now open correctly when I double click them.

A trip through wake-on-wireless-LAN

For several months now I’ve been struggling with an issue that showed up after I managed to set up Wake on Wireless LAN (WoWLAN) on my desktop computer, and I thought the whole process it would make for a great blog post, so here we go!

Chapter 1: got it to work!

Getting WoWLAN to work wasn’t particularly hard, it basically boiled down to two things:

  • Make sure the BIOS would allow it.
  • Configure the wireless NIC settings in Windows.

The first step was about looking for the appropriate settings in my BIOS, and setting them to the correct values. Some people might not be able to complete this if their motherboard/NIC/BIOS doesn’t support WoWLAN, and in that case there’s not much to be done other than changing hardware (or making sure it’s not just a missing BIOS update, which it probably isn’t). In my case, the only relevant setting (and maybe not even that, since I only use WoWLAN with state S3 (sleep), not S4 (hibernate) nor S5 (soft-off)) was S4/S5 Wake on LAN.

BIOS options

For the second step I went to Device Manager, double-clicked my wireless card under “Network Adapters”, and made sure that Wake on Magic Packet and Wake on Pattern Match were set to Enabled in the Advanced Settings tab; and that “Allow this device to wake up the computer” and “Only allow a magic packet to wake up the computer” were checked in the Power Management tab.

NIC settings

NIC settings - power management

And voilà! I was immediately able to put my computer to sleep, and wake it up with a Wake-on-LAN packet sent through the WiFi.

Chapter 2: an issue shows up

Things were great until I noticed that my computer was waking up on its own every night after I went to bed and put it to sleep.

I first went to Windows’ Event Viewer and found this sequence of events (the first one has the wrong time because Windows still thinks it’s the same moment as when the computer went to sleep, and the second event fixes that by syncing the OS clock with the hardware clock):

Wakeup Event 1

Wakeup Event 2

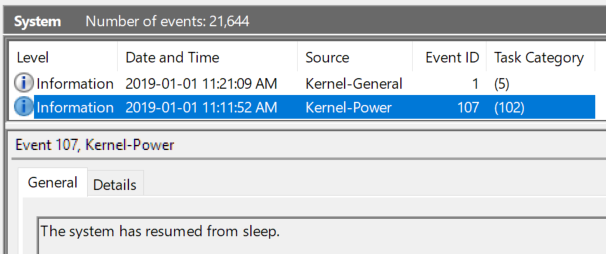
And a couple of entries later, this one:

Wakeup Event 3

It was clear that the NIC was responsible for waking up the computer, and sure enough, if I disabled its “Allow this device to wake up the computer” setting in Device Manager, the problem went away. But that setting is needed for WoWLAN to work, so I started looking for a solution.

Playing around with the other settings in Device Manager didn’t help. Intel provides some documentation on those that was pretty useful. For obvious reasons, of particular interest were NS offloading for WoWLAN, ARP offloading for WoWLAN, GTK rekeying for WoWLAN, and Sleep on WoWLAN disconnect. The first two let the OS “delegate” some work to the NIC when it is sleeping, so that some things can happen without it waking up. They are enabled by default, and it sounds like that’s the way it should be. The documentation for GTK rekeying for WoWLAN is not clear on what it does, but some additional research shows that it’s related to the PMWiFiRekeyOffload standard keyword for power management, which says “A value that describes whether the device should be enabled to offload group temporal key (GTK) rekeying for wake-on-wireless-LAN (WOL) when the computer enters a sleep state.” So just like the previous two, we want that enabled.

Finally, I just can’t wrap my head around what Sleep on WoWLAN disconnect is. The documentation says “Sleep on WoWLAN Disconnect is the ability to put the device to sleep/drop connection when WoWLAN is disconnected.” but I don’t understand what “WoWLAN is disconnected” means. I think of WoWLAN as an event, not a persistent connection. So I didn’t really mess around with this one. Maybe it’s supposed to say “disabled” instead of “disconnected”, and it lets the NIC go to sleep if WoWLAN is disabled…

I don’t remember what else I did to try and fix this, but if there was anything else, it didn’t work. After a while, I resigned myself and didn’t even try to put my computer to sleep before bed.

Chapter 3: a second attempt

Some time later I came back to the issue and this time my research first led me to the powercfg utility.

powercfg /lastwake didn’t give me any new information, it also said that it was the NIC waking up the computer:

powercfg lastwake

powercfg /waketimers (which needs to run in an elevated command prompt) said there were no active wake timers on my system, so nothing to do there:

powercfg waketimers

Just to be sure, I also went through all the tasks in Task Scheduler, trying to figure out if a scheduled action was the culprit. A couple of them seemed like potential candidates but few of them could wake up the computer, and they were disabled or had schedules that didn’t match the symptoms I was seeing.

Chapter 4: found the root cause!

Fast forward another month or so, and I found a new clue: the wake up from sleep didn’t happen only during the night, the time of day didn’t matter! My computer is usually on all day, so I hadn’t noticed that before. But putting it to sleep at any time during the day resulted in the same wake-up-on-its-own behavior after some time. And more importantly, the computer always woke up on the 41st minute of the hour.

Knowing that, I did some more research and found this question in the Intel forums, with a superbly documented reddit post by someone having the exact same problem.

The author of that post did A LOT of research and troubleshooting, and found out that his issue was related to the Group Key Update feature of WPA2, and concluded that the GTK rekeying for WoWLAN setting in the NIC probably had a bug, since it should have offloaded handling of the appropriate network packets to the NIC, without having to wake up the computer.

I wanted to really soak up all the information there and make sure I understood what was happening, so I followed the research on that post and applied it to my scenario.

My starting point was this document from Microsoft regarding WoWLAN on Windows and which specific things can wake up the computer. Besides receiving a WOL packet or WOL magic pattern, 4 things can do that:

  • AP Association Lost: i.e. the NIC loses its connection to the AP. My AP wasn’t restarting or anything similar, so that couldn’t be it.
  • GTK Handshake Error: (here I had to go and research what “GTK” was. It’s not super relevant to this post, but here I found a great explanation) I’m not sure what could cause an error of this sort, probably something like changing the WiFi pre-shared key on the AP? I wasn’t seeing any errors in my AP/Router’s log, and besides the wake-up issue, my WiFi worked fine, so I guessed it was probably not this.
  • 802.1x EAP-Request/Identity Packet Received: this only applies to WPA2-Enterprise, and since I’m using WPA2-Personal, it couldn’t be it.
  • Four-way Handshake Request Received: thanks to all the reading I had done up to this point I knew that 4-way handshake is the process by which the AP and a wireless client establish keys (PTK and GTK) to encrypt the packets sent between them, and that my AP was configured to update the GTK every hour. And my computer was restarting every hour. So… We probably have a winner!

I confirmed that this is probably the culprit by changing the GTK rekeying interval (referred to in my settings as “Group Key Update”) in my router. After that, the minute when my computer woke up changed to match the time of the AP restart, so I’m pretty confident that this is it.

Chapter 5: …but it still doesn’t work

Yet, just like for that other person having this issue, having GTK rekeying for WoWLAN enabled wasn’t helping, so I’m inclined to agree that there’s a bug somewhere in Windows or the NIC driver.

Speaking of which… I looked for updates to my NIC driver, and there was one but it didn’t help things.

A workaround for those that can do this, is to increase the GTK rekey interval in the router. I was going to set it to 12 hours (at 9am/pm) so it didn’t happen while I was asleep, but my router only allows up to 2 hours.

Conclusion

So I’m still leaving my computer on when I go to bed because I know it will wake up on its own not long after. I’ll keep my eye out for updates to the NIC driver and see if they help.

In any case, I got a lot out of this ordeal. I learned about low-level details of WiFi connections like the Beacon Frame, the Beacon Interval and DTIM, plus some other things mentioned above. So even if the problem hasn’t gone away, trying to solve it has been a very productive endeavor.

Optimizing PIA OpenVPN speed on Advanced Tomato

A while back I noticed that my ISP was throttling my speeds for most things, and that using a VPN worked around that throttling. I use Private Internet Access (aka PIA) as my VPN provider (I’d recommend them any time, if you sign up here we’ll both get 1 month free!), and I confirmed this with their desktop application running on my computer, but I wanted a way to centralize the VPN connection so I didn’t have to start one form each device in my home network.

Luckily I use open-source firmware Advanced Tomato on my Asus R7000 router, and it can run up to two simultaneous OpenVPN clients. PIA can be set up in a bunch of ways one of which is with an OpenVPN client, so it was perfect! They even have a guide on how to set it up in Advanced Tomato.

So I got everything working without much hassle… but my Internet speed was way worse than when I used the PIA desktop application. With the app I got my “line speed” of ~60 Mbps (what I expect to get from my ISP), but with OpenVPN on the router I got an average of 12 Mbps (I’ll only talk about download speeds, since my upload isn’t particularly fast anyway). Some research led me to decide that the router’s processor was the bottleneck, particularly due to the need to encrypt/decrypt traffic from the VPN tunnel. It’s a dual-core 1GHz ARM chip which apparently does not have native hardware instructions for cryptography, so it needs to do it with software and is thus limited by CPU speed. Some newer routers with newer chips are apparently getting hardware-accelerated cryptography. Keep that in mind when buying a router if you have a setup like mine.

I tried tweaking some settings in the router’s GUI but couldn’t get any real improvement, so I resigned myself to lower speeds when I wanted to have the VPN on in the router.

Today I decided to come back to the topic and see if I could improve the situation, and found two things that made a noticeable difference:

  • Overclocking the router
  • Adding the fast-io, sndbuf and rcvbuf settings to my OpenVPN configuration:
    openvpn custom settings

I’ve never been one for overclocking my hardware, but I read several posts about people doing it without problems so I went ahead and bumped my router’s clock speed from 1 to 1.4 GHz, and just with that, my Internet speed jumped from 12 to 18 Mbps. Not back-breaking, but a very appreciated 50% improvement!

But the real game changer were the OpenVPN settings, which took me from 18 to 30-35 Mbps! The OpenVPN documentation has great explanations for all possible options if you’re interested in the details. In short, fast-io can help non-Windows systems by optimizing certain code paths, while sndbuf and rcvbuf control the send/receive buffer sizes for the UDP or TCP socket.

Now, note that the specific number for sndbuf and rcvbuf will probably vary for each person/situation. The ideal value will depends on the latency to your VPN server, the reliability of the connection, and maybe other things. Regrettably, I don’t have a formula for you, so I’d suggest starting with a value of 524288 and then moving from there. In my case, 786432 was an improvement but going all the way to 1048576 gave me lower speeds. YMMV.